|
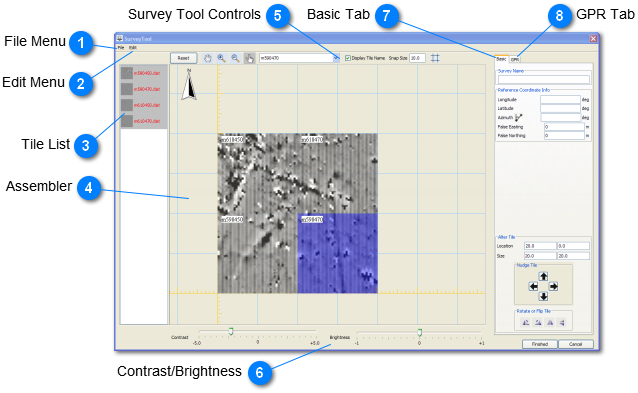
 File Menu
Select Add Tiles from the Survey Tool File Menu to add tiles to a new or existing survey. This will open the Load File dialog. |
 Edit Menu
There are four options under the Edit Menu:
-
Delete Tile in Survey - click on a tile in the Assembler and select this option to remove the tile from the survey, but not from the Tile List (it can be added back in any time during the current editing session (it is removed from the list once you click Finished)
-
Remove Tile from List - click on a tile name in the Tile List (left column) and select this option to remove it from the list. Once this is done a tile cannot be added again without going through the Load File dialog
-
Edit Selected Tile - This option allows you to modify individual tiles. See Tile Editor for details.
-
Set Contrast Maximum - select this option to change the minimum and maximum for the Contrast slider bar at the bottom of the Survey Tool.
|
 Tile List
Lists all the tiles that have been added to the survey. When tiles are first added they appear with a white background. Click on each one and drag to the Assembler window to arrange the tiles into a survey. |
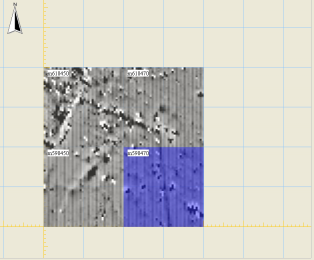
 Assembler
The main central part of the Survey Tool is the Assembler. Use the mouse to drag tiles from the Tile List into this window and arrange into a Survey. Tiles can be different sizes and resolutions, and do not have to ling up in a regular grid.
You can zoom and pan using tools in the controls bar directly above this window, or use a 3-button mouse in the same way as is used in the Main Window (see Mouse Controls)
The Reference Coordinate Info in the Basic Tab refers to the location where the yellow, tick-marked grid lines cross, located at the lower-left corner in the above example.
A north arrow is located in the upper-left, and will change as you adjust the Azimuth, also located in the Reference Coordinate Info portion of the Basic Tab. |
 Survey Tool Controls
The controls along the top of the Survey Tool provide means for assembling tiles in a survey, including zoom, pan, zoom to a specific tile, displaying time names, snap size, and grid line spacing.
|
 Contrast/Brightness
Use these slider bars to adjust the contrast and brightness of the survey that you are assembling. Increasing contrast helps to make anomalies more visible to see if tiles are oriented correctly. Tiles can be rotated and resized using tools in the Basic Tab. |
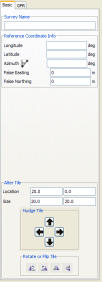
 Basic Tab
The Basic Tab is where you enter a survey name, coordinates, and azimuth. You can also enter coordinates for the lower-left corner of a tile, as an alternative to dragging with the mouse, and change the size of the tile to make it larger or smaller. Finally, you can nudge a tile according to the snap size of the grid, and rotate or flip tiles to correct for orientation errors.
|
 GPR Tab
The GPR tab is to create and edit GPR slices using depth or time intervals and different methods for summarizing the amplitudes.
|
|
|